Saturday, March 16, 2013

Hair Ideas for PROM.

So, I am going with this series posts themed around Prom which is coming up. And while I was looking for hair ideas for some of the girl's hair I will be doing for Prom, I thought that I should help you find and give tip for your hair for Prom. 

On this trek through the internet, I found so many wonderful sites that were full of advice and different unique hairstyles. Some of them were better then others. 

The first site I found was full of so many different articles about different styles and hairstyles for different lengths of hair. It is called Latest- Hairstyles. It had details for each style about how a person could do that hairstyle. And it pretty cool. You should definitely check it out. 


The next site was from About.com. It was very detailed. And it had all the hairstyle prom trends for 2013. With every type of hairstyle there were examples and details about what you would need to do the hairstyle and what type of hair is best for it. 


The other site that I loved was at Seventeen. This article had all the hair trends for Prom in 2013. It explained with each hairstyle how to do the style. Definitely take a look.


I will have a more detailed post to come for hair trends, styles, and tips to come up. Until check out these websites because they are pretty great. 
I also wanted to tell you to also check out Pinterest because they are some really good hair boards on Pinterest. 
Until next time, have fun and good luck!

                                      Andrea 

Copycat Ragu Tomato Sauce

Lately, I have been playing around with marinara sauces. A lot of marinara sauces are a crushed tomato base. These sauces are usually pretty thick but sometimes can be slightly watery or runny but the flavor is amazing. But if you are used the canned sauces from the  store such as Ragu or Prego. Ragu, for example, seems to me to be a tomato sauce or paste based. My family liked the texture and thickness of the Ragu sauces and I couldn't get that with my favorite marinara sauces for some reason. And so now I sometimes make this copycat Ragu sauce with some minor adjustments. 

So after a long internet search, I found this recipe for which I made some minor adjustments. 
The recipe I found was addressed "Copycat Ragu Tomato Sauce"

The Ingredients you will need:
  • 29 oz. Tomato sauce 
  • 14.5 canned Italian diced tomatoes or can of crushed tomatoes
  • 4 oz. sliced mushrooms (optional)
  • 5 tsp. granulated sugar
  • 1 tbs. olive oil
  • 1 tbs. grated Parmesan and Romano cheese each.
  • 1 tsp. dried basil 
  • 1/2 dried parsley
  • 3 garlic cloves chopped finely. (or 1 1/2 tsp. of minced garlic)
  • 1/8 tsp. black pepper
  • 1 bay leaf
  • 1/4 cup onion finely chopped (optional)
Directions:

In a sauce combine all the ingredients and simmer for 20 minutes (simmer on a very low flame otherwise you will scorch your pot. Simmer uncovered  or partially covered to help it reach the desired thickness. When stirring use a wooden spoon rather than an aluminum or metal spoon.). After it is finished cooking, serve as desired. 

* I added ground hamburger to the sauce. Or you can even add meatballs. Get creative. 


 Have fun and get creative. Good luck!

Andrea 


Sunday, March 10, 2013

Cookie Dough Cupcakes

So everyone loves chocolate chip cookies and everyone loves cake, so why not combine to make something everyone will extremely love? You can with this amazing recipe. And why stop with just the cookie dough cupcake, when you can also have an amazing cookie dough frosting to pair with it. 
I was recently looking for some fun cupcake recipes for my sister's birthday and my birthday. And instantly thought of cookie dough cupcakes. I had made them once but I didn't really like the concept of the recipe, so I looked for a new one and I found one that I like. I found this recipe, courtesy of the Tidy Mom. From that recipe though I conjured up my own version of this recipe. 

Okay, so here is how you make them.

For the Cookie dough cake batter you will need:

  • 3 sticks of butter, at room temperature
  • 1 1/2 cups  brown sugar, packed
  • 4 large eggs
  • 2 2/3 cups  all-purpose flour
  • 1 tsp.  baking powder
  • 1 tsp.  baking soda 
  • 1/4 tsp.  salt
  • 1 cup milk
  • 2 tsp. vanilla extract
  • 1 cup chocolate chips ( semisweet or bittersweet)
For the cookie dough frosting you will need:
  • 3 stick unsalted butter, at room temperature
  • 3/4 cup brown sugar, packed
  • 3 1/2 cup powdered or confectioners sugar
  • 1 cup all-purpose flour
  • 3/4 tsp. salt
  • 3 tbs. heavy cream
  • 2  tsp. vanilla extract
For the cookie dough filling, you will need:
  • Refrigerated chocolate chip cookie dough from store, rolled into balls.
  • Or your favorite chocolate chip cookie recipe rolled into balled ( after they are rolled into balls, put them in freezer for 2-3 hours so that it is firm)
Instructions for the cake: 


  1. Preheat oven to 350 degrees.
  2. Combine the sugar and butter, using a mixer cream them together until it's light and fluffy ( about 3 minutes). Add eggs, one at time, beating well after each addition and scraping the the sides after each one as well. 
  3. Whisk the flour, baking soda, baking powder, and salt together in a medium sized bowl.
  4. Alternating add the dry ingredients to the mixer bowl with the milk on low speed, beginning and ending with the dry ingredients, mixing each addition just until it is incorporated.
  5. Blend in the vanilla extract.
  6. Fold in the chocolate chips with a spatula.
  7. Divide batter into 24 cupcake liners. 
  8. Drop one rolled cookie dough into each cupcake liner filled with the cake batter. Do not push the cookie dough down.
  9. Bake in oven for 18-25 minutes, or until a toothpick comes clean when inserted into cake portion of cupcake comes out clean. Cool for 10 minutes before removing from pans, after transfer to wire rack to cool.
Instructions for frosting:
  1. Beat butter and brown sugar with a mixer on high speed until creamy and fluffy.
  2. Mix in the powdered sugar until smooth. 
  3. Beat in the flour and the salt.
  4. Mix in the cream and vanilla extract until smooth and combined. 
I used a 1M tip to pipe frosting onto cupcakes. You can further decorate by sprinkling cupcakes with mini chocolate chips and with a small cookie. 


These were the cupcakes I made for my sister's birthday. She took them to school to share with her class. I sprinkled the cupcakes with blue icing sugar and a little decoration that was the theme for her cookie dough cupcakes. These cupcakes were a hit for everyone who ate them and I am sure they will be hit with you too!

As usual good luck and have a great day! And if it's your birthday, I hope it's a good one!

Peace, love, bake on.

 Andrea

Fun Fact about me: I share my birthday with my younger sister and we are 7 years apart. 

Friday, March 1, 2013

Prom dresses on a budget


I don't know about you, but I am on a budget. And Prom isn't any exception. I was looking for amazingly cute dresses for amazingly low prices and so I went on a search on Google.

 I wanted a dress that made a statement without the bank sending me an over statement.  I spent many hours looking at the department store looking at their dresses and well, I wasn't very impressed.  I found that there wasn't much variety. With not much variety, there's a  big chance that someone will end up wearing the same dress as someone else, which is so uncool. Plus, I want to be original, and you can't make much of a statement when someone else is wearing the same dress as you. 

On my search on Google, I found these two amazing websites. They pretty much made my week when I found them. That's how awesome they are. The great thing about these websites is that there is a variety. Which is awesome.  

The first website I found is called Milanoo. This website is filled with dresses of every color, style, shape, and for every occasion. The best thing is that most of the dresses are great to buy if you are a budget. The dresses seem to be reasonably priced. All in all pretty great site. 

The next website I found is my favorite. This website is called JJ's House. This is another website that sells all things fashion like Milanoo. This site also has a great variety. But my favorite part of JJ's House is that basically every dress is available in a variety of colors. (Most of the dresses I looked at were available in like 28 different colors) Another great thing about it is that everything is very user friendly, which is a huge bonus. Basically,  I don't think this website will let you down. 

Here are a few dresses that I found from these 2 websites but these aren't the only styles of dresses that are available from these websites. 


Check out these websites, and tell me what you think of them. Another great place to look is a consignment store or half price store. My friend, for example, got her dress at this cute little consignment brand new with a minor tear that was easily sewn to be fixed for a dollar. This dress that she bought was normally sold for $165. Now no guarantee that we will all get that lucky finding an amazing dress for such an amazingly low price but I am sure we will find a good bargain for a beautiful dress if we just take our time to look. I hope you find everything you're looking for so that you may look amazing and have a magical prom. 

                                                                 Andrea


Monday, February 25, 2013

A fishtail braided hairstyle

I am not sure what to call this braided hairstyle, but I will thoroughly explain it to you.
Basically, this braid is three fishtail braids braided into a standard braid. 
I did this braid on my sister a while back and I found pictures of it. So I decided to share it with you. The great thing about it is that it is rather simple to do.


To do this hairstyle you need some rubber bands/ hair ties. 
To begin section the hair into three even sections to braid into fishtail. Next braid each section, doing a fishtail braid. Tie each braid back with a rubber band. After you have braided all three sections, braid the three sections together doing a normal three strand braid. After you have braided them together, tie back the braid with either a hair tie or rubber band. You should now be able to remove the individual rubber band from the three original fishtail braids. 

I would recommend using rubber bands for the three fishtail braids because they are rather small and not very visible. So if you don't take the rubber band off the braids for some reason then it is not very noticeable. 

As always , good luck and have fun!

                                           Andrea 

Friday, February 22, 2013

Foil Curls

Did you read the title and say "What"?  Well I can reasure you that these curls are so adorable. I have done many types of curling and this one was really insteresting. I was experimenting and after some research I found this type of curling, and I had to try it out for myself.
If you have problems getting your hair to curl with a curling iron, try this technique. You might find that it works for you. My sister, who I first tried this haristyle on, has extremely long, thick straight hair. And so as you maybe able to infer, her hair doesn't always hold curl well. But these curls held fairly well. With hairspray these curls held really well in her hair.
To do this hairstyle you will need:
Foil (cut into squares or rectangles)
hair straightener

Seems simple, right?
  1. The size of your foils pieces depends on how long your hair is and how loose you want your curls. I average size of my foil pieces was about 6 x 8 and that was for my sisters long hair. The smallest you would want to go is 4 x 6.
  2. Before coiling your hair, brush through your hair to get rid of tangles. After, coil a strand of hair about 1-2 inches thick around your fingers. I used 3 fingers for a looser curl, and use 1 finger for trighter curls.
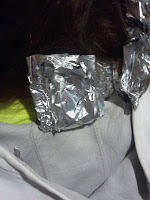
  3.   Fold a piece of foil around the coiled strand. To do this place the coiled hair on foil, then fold foil in half, and the fold up. Then fold the sides in if there is extra foil room. 


4. Repeat this step until you have gone all the way around your head putting all the hair in foil.


 5. Using your hair straightener, heat the foil. For larger curls, 40-50 seconds, and for smaller curls, 20-30 seconds. I did mine for about 30-40 seconds. 
6. After doing this to each piece of foil, let your hair cool completely. After it is cool, unwrap each foil. The foil slides of but it can make your hair frizzy, so I would unwrap each gently to keep from getting frizzy. 

You can hair spray, if you would like but you don't have to. Style with the curls as you want or leave them the way they are because they are just so great.


 And there you have it, foil curls. Try it and you won't be disappointed, I wasn't. Good luck and don't forget to have fun! If any of of my instructions are unclear, please comment.

 **One side note my sister who I did this hairstyle on has very thick and straight hair. So her hair doesn't always curl well. So the curls may very in size and bounce depending on hair type and how thick you make each coil.
                                                   Andrea 

Thursday, February 21, 2013

My favorite Buttercream frosting.

Have you tried numerous buttercream recipes and still haven't been wowwed? Well I know I went through that, and after trial and error I now can say I have found my favorite buttercream frosting recipe.
The great thing about buttercream is that it is so versatile and fairly simple to make. Buttercream is a tradional frosting that can be easily used to pipe frosting and decorate with. I found that recipes I had used before were just never thick enough and this recipe is always thick the first time.
Buttercream Frosting:
1  1/2  cups of butter (at room temperature)
1 teaspoon vanilla extract
4 cups powdered sugar or confectioner's sugar (sifted)
3 tablespoons heavy cream (whipping cream)
First, using a blender whip the butter until it is a lighter color, which should take 3-5 minutes. Next, add the vanilla. Mix together. Next, add half the powdered sugar and two tablespoons of heavy cream. Start mixing that together. Add the remaining sugar and heavy cream, and mix together until it is all one consistency.
You can always thin this frosting out if it slightly to thick for you. You can either add a teaspoon or two of 2% milk or more heavy cream.
When I use this recipe, I almost always add frosting dye. This recipe does coloring well.


In the picure above, I used this buttercream recipe and added Wilton Royal Blue frosting dye. The cake recipe I used to make the cupcakes can be found on my blog or click HERE.
I hope the direction aren't to confusing and if they are please comment!

Peace, love, Bake on.
               
                                                Andrea