Monday, February 25, 2013

A fishtail braided hairstyle

I am not sure what to call this braided hairstyle, but I will thoroughly explain it to you.
Basically, this braid is three fishtail braids braided into a standard braid. 
I did this braid on my sister a while back and I found pictures of it. So I decided to share it with you. The great thing about it is that it is rather simple to do.


To do this hairstyle you need some rubber bands/ hair ties. 
To begin section the hair into three even sections to braid into fishtail. Next braid each section, doing a fishtail braid. Tie each braid back with a rubber band. After you have braided all three sections, braid the three sections together doing a normal three strand braid. After you have braided them together, tie back the braid with either a hair tie or rubber band. You should now be able to remove the individual rubber band from the three original fishtail braids. 

I would recommend using rubber bands for the three fishtail braids because they are rather small and not very visible. So if you don't take the rubber band off the braids for some reason then it is not very noticeable. 

As always , good luck and have fun!

                                           Andrea 

Friday, February 22, 2013

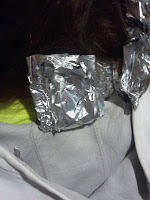
Foil Curls

Did you read the title and say "What"?  Well I can reasure you that these curls are so adorable. I have done many types of curling and this one was really insteresting. I was experimenting and after some research I found this type of curling, and I had to try it out for myself.
If you have problems getting your hair to curl with a curling iron, try this technique. You might find that it works for you. My sister, who I first tried this haristyle on, has extremely long, thick straight hair. And so as you maybe able to infer, her hair doesn't always hold curl well. But these curls held fairly well. With hairspray these curls held really well in her hair.
To do this hairstyle you will need:
Foil (cut into squares or rectangles)
hair straightener

Seems simple, right?
  1. The size of your foils pieces depends on how long your hair is and how loose you want your curls. I average size of my foil pieces was about 6 x 8 and that was for my sisters long hair. The smallest you would want to go is 4 x 6.
  2. Before coiling your hair, brush through your hair to get rid of tangles. After, coil a strand of hair about 1-2 inches thick around your fingers. I used 3 fingers for a looser curl, and use 1 finger for trighter curls.
  3.   Fold a piece of foil around the coiled strand. To do this place the coiled hair on foil, then fold foil in half, and the fold up. Then fold the sides in if there is extra foil room. 


4. Repeat this step until you have gone all the way around your head putting all the hair in foil.


 5. Using your hair straightener, heat the foil. For larger curls, 40-50 seconds, and for smaller curls, 20-30 seconds. I did mine for about 30-40 seconds. 
6. After doing this to each piece of foil, let your hair cool completely. After it is cool, unwrap each foil. The foil slides of but it can make your hair frizzy, so I would unwrap each gently to keep from getting frizzy. 

You can hair spray, if you would like but you don't have to. Style with the curls as you want or leave them the way they are because they are just so great.


 And there you have it, foil curls. Try it and you won't be disappointed, I wasn't. Good luck and don't forget to have fun! If any of of my instructions are unclear, please comment.

 **One side note my sister who I did this hairstyle on has very thick and straight hair. So her hair doesn't always curl well. So the curls may very in size and bounce depending on hair type and how thick you make each coil.
                                                   Andrea 

Thursday, February 21, 2013

My favorite Buttercream frosting.

Have you tried numerous buttercream recipes and still haven't been wowwed? Well I know I went through that, and after trial and error I now can say I have found my favorite buttercream frosting recipe.
The great thing about buttercream is that it is so versatile and fairly simple to make. Buttercream is a tradional frosting that can be easily used to pipe frosting and decorate with. I found that recipes I had used before were just never thick enough and this recipe is always thick the first time.
Buttercream Frosting:
1  1/2  cups of butter (at room temperature)
1 teaspoon vanilla extract
4 cups powdered sugar or confectioner's sugar (sifted)
3 tablespoons heavy cream (whipping cream)
First, using a blender whip the butter until it is a lighter color, which should take 3-5 minutes. Next, add the vanilla. Mix together. Next, add half the powdered sugar and two tablespoons of heavy cream. Start mixing that together. Add the remaining sugar and heavy cream, and mix together until it is all one consistency.
You can always thin this frosting out if it slightly to thick for you. You can either add a teaspoon or two of 2% milk or more heavy cream.
When I use this recipe, I almost always add frosting dye. This recipe does coloring well.


In the picure above, I used this buttercream recipe and added Wilton Royal Blue frosting dye. The cake recipe I used to make the cupcakes can be found on my blog or click HERE.
I hope the direction aren't to confusing and if they are please comment!

Peace, love, Bake on.
               
                                                Andrea


Sunday, February 17, 2013

Boxed cakes in a pinch.

If your are like me, you are always in a hurry and need a cake in a pinch. I sometimes have to use boxed cake mixes. And as you know, boxed cakes mixes just don't taste as good as cakes made from scratch. So if you are in a pinch and need a cake in a hurry, use a boxed cake mix with these minor but amazing adjustments.

So, all you have to do to make a box cake taste bettter is to follow these few simple steps.
If your cake mix asks you to use oil, use butter instead and double the amount. So if it asks for a 1/2 cup of oil, use 1 cup of butter instead.Next, when the mix asks for eggs add 1 or 2 extra eggs. Lasltly, the mix will asks for water, use milk instead.Even with these few adjustment, you still bake the cake at the same temperature and time that it says.
If you follow these few simple steps, you won't be able to tell that you even used abox cake.
Good luck and have fun baking.
Thanks,
               Andrea

Sunday, February 10, 2013

Hair Bows

Do you want something fun and quirky? Well, a hair bow may be right up your alley. Hair bows are super cute and very original. It's not very often you see everyone trending a hair bow. 


The great thing about hair bows is that they can be taken to from day to night. They can be dresses up and down. So they are really versatile. 
Another plus is that they are super super easy. They take 5-10 minutes, so can easily be done in the morning rush.

All you need is a hair ties and a few bobby pins.

Directions:
  1. First put your hair up in a high ponytail but before you put through the last loop make a bun.
  2. Next carefully section the bun in half evenly.
  3. Separate the halves by pulling apart. 
  4. Put each side to the side of your ponytail with a few bobby pins until it is secure. ( for a better example of what it looks like look above at my pictures)
  5. Now you should have this little tail in the front from the bun, next you flip that to the back so it looks like the center of a bow. Use a bobby pin to secure that. 
  6. All Done!

There you have it a hair bow. If my instructions are too confusing, I am so sorry. I am really working hard on my communication skills. If there are problems, you can comment and you can always search for a good video. This video is pretty good tutorial. 

Thanks!

         Andrea


Thursday, February 7, 2013

Fishtail Side-do

Do you need a super cute hairstyle that looks intricate with out a huge hassle? Well over Christmas, I did this cute and rather simple braided do on my sister. As long as you know how to french fishtail braid diagonally then you can do this hairstyle. 


My instructions are most likely are really confusing, but this hair style is really simple. SO you could probably just look at the pictures to understand what you need to do.

But if you are brave and want to try out my instruction they are below, good luck!


To do this hairstyle follow these few simple steps:

All you need is a rubber band or two, bobby pins, and if you want to a cute pin or flower.
  1. Starting at either the left or right top side of your hair pick up two 1/2-1 inch pieces of your hair. Then french fishtail braid diagonally down to the other side of your head braiding all the way the to the ends.
  2. Next you need tie that braid back with a rubber band so that it doesn't come undone. ( I usually a black or clear band, so that it isn't as visible)
  3. After you should gently wrap the braid into a bun or, for lack of a better description, wrap the braid where the braid diagonally is and coil or wrap it into a bun type thing like it is pictured above. (wrap the end of the braid under the bun so that the band isn't visible)
  4. Secure it with bobby pins. 
  5. Put a hair accessory where you like to make it even prettier.   


If my instruction were to confusing, please tell me so. PLEASE. Leave a comment below to tell me what was confusing and/or how I can make them better.

Thanks!
            Andrea


Sunday, February 3, 2013

The US of YA

Hey readers! I was looking at books I was thinking about reading, and I found this chart and is called the The United States of YA. It's pretty awesome. I pretty much fell in love. I now have a lot more books to add to my already huge reading list.


Is this not one of the most amazing things you have ever seen?! I have actually read a few of these but a lot of them I haven't yet but will. Have you read any of these? Are you adding any of them to your reading list? I know I am.

I wish you a good reading!
           Andrea