Monday, February 25, 2013

A fishtail braided hairstyle

I am not sure what to call this braided hairstyle, but I will thoroughly explain it to you.
Basically, this braid is three fishtail braids braided into a standard braid. 
I did this braid on my sister a while back and I found pictures of it. So I decided to share it with you. The great thing about it is that it is rather simple to do.


To do this hairstyle you need some rubber bands/ hair ties. 
To begin section the hair into three even sections to braid into fishtail. Next braid each section, doing a fishtail braid. Tie each braid back with a rubber band. After you have braided all three sections, braid the three sections together doing a normal three strand braid. After you have braided them together, tie back the braid with either a hair tie or rubber band. You should now be able to remove the individual rubber band from the three original fishtail braids. 

I would recommend using rubber bands for the three fishtail braids because they are rather small and not very visible. So if you don't take the rubber band off the braids for some reason then it is not very noticeable. 

As always , good luck and have fun!

                                           Andrea 

Friday, February 22, 2013

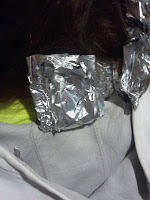
Foil Curls

Did you read the title and say "What"?  Well I can reasure you that these curls are so adorable. I have done many types of curling and this one was really insteresting. I was experimenting and after some research I found this type of curling, and I had to try it out for myself.
If you have problems getting your hair to curl with a curling iron, try this technique. You might find that it works for you. My sister, who I first tried this haristyle on, has extremely long, thick straight hair. And so as you maybe able to infer, her hair doesn't always hold curl well. But these curls held fairly well. With hairspray these curls held really well in her hair.
To do this hairstyle you will need:
Foil (cut into squares or rectangles)
hair straightener

Seems simple, right?
  1. The size of your foils pieces depends on how long your hair is and how loose you want your curls. I average size of my foil pieces was about 6 x 8 and that was for my sisters long hair. The smallest you would want to go is 4 x 6.
  2. Before coiling your hair, brush through your hair to get rid of tangles. After, coil a strand of hair about 1-2 inches thick around your fingers. I used 3 fingers for a looser curl, and use 1 finger for trighter curls.
  3.   Fold a piece of foil around the coiled strand. To do this place the coiled hair on foil, then fold foil in half, and the fold up. Then fold the sides in if there is extra foil room. 


4. Repeat this step until you have gone all the way around your head putting all the hair in foil.


 5. Using your hair straightener, heat the foil. For larger curls, 40-50 seconds, and for smaller curls, 20-30 seconds. I did mine for about 30-40 seconds. 
6. After doing this to each piece of foil, let your hair cool completely. After it is cool, unwrap each foil. The foil slides of but it can make your hair frizzy, so I would unwrap each gently to keep from getting frizzy. 

You can hair spray, if you would like but you don't have to. Style with the curls as you want or leave them the way they are because they are just so great.


 And there you have it, foil curls. Try it and you won't be disappointed, I wasn't. Good luck and don't forget to have fun! If any of of my instructions are unclear, please comment.

 **One side note my sister who I did this hairstyle on has very thick and straight hair. So her hair doesn't always curl well. So the curls may very in size and bounce depending on hair type and how thick you make each coil.
                                                   Andrea 

Thursday, February 21, 2013

My favorite Buttercream frosting.

Have you tried numerous buttercream recipes and still haven't been wowwed? Well I know I went through that, and after trial and error I now can say I have found my favorite buttercream frosting recipe.
The great thing about buttercream is that it is so versatile and fairly simple to make. Buttercream is a tradional frosting that can be easily used to pipe frosting and decorate with. I found that recipes I had used before were just never thick enough and this recipe is always thick the first time.
Buttercream Frosting:
1  1/2  cups of butter (at room temperature)
1 teaspoon vanilla extract
4 cups powdered sugar or confectioner's sugar (sifted)
3 tablespoons heavy cream (whipping cream)
First, using a blender whip the butter until it is a lighter color, which should take 3-5 minutes. Next, add the vanilla. Mix together. Next, add half the powdered sugar and two tablespoons of heavy cream. Start mixing that together. Add the remaining sugar and heavy cream, and mix together until it is all one consistency.
You can always thin this frosting out if it slightly to thick for you. You can either add a teaspoon or two of 2% milk or more heavy cream.
When I use this recipe, I almost always add frosting dye. This recipe does coloring well.


In the picure above, I used this buttercream recipe and added Wilton Royal Blue frosting dye. The cake recipe I used to make the cupcakes can be found on my blog or click HERE.
I hope the direction aren't to confusing and if they are please comment!

Peace, love, Bake on.
               
                                                Andrea