Thursday, August 24, 2017

I'm getting married!

Hey everyone! I have some good news. I'm getting married! I got engaged April 30th, 2017. I know what you're thinking, why am I just now telling you all about this? Good question. I could give you several excuses, or I could just say I've been busy enjoying my engagement to fiancé with my family and friends-- which is 1000% true. Plus, I have been busy wedding planning, which is both my favorite thing and the most stressful. 

On our way to our celebratory dinner

Anytime, I can share my engagement story, I do (thanks for listening:) ). My fiancé, Brett, proposed the weekend of our three year anniversary.  We had been talking about marriage for quite sometime, and we had even gone to look at engagement rings a couple times. When he went to shop for engagement rings officially in January he took my best friend, Grace, and one of my younger sisters, Victoria. Honestly, I was really surprised he kept it a secret because we aren't very good at keeping secrets from each other. He even at one point went and looked at engagement rings after having already purchased a ring, which really threw me off the tracks. 


The weekend he proposed, I was going at a bridal shower for my best friend, Grace, and afterwards we were supposed to go on a fancy date to our favorite Italian restaurant to celebrate our three year anniversary. So, while I was at Grace's bridal shower, he was secretly getting everything ready for his grand proposal with his friend. What I didn't know was that Grace and her then fiancé, Quentin (now husband) were in on the secret (and because Grace can't keep secrets a good portion of those who attended the shower also knew). They were supposed to keep me busy while Brett was prepping the proposal location. The really funny thing is that several times during the bridal shower, I mentioned how it'd be really awesome if Brett proposed on our anniversary, but how I didn't think it'd actually happen. I don't know how any of them kept a straight face, but they didn't let it on that they knew at all. After the bridal shower was over, Grace and Quentin kept trying to get me to stay and come over to hang out with them, but I kept on insisting that Brett was waiting on me (which I thought he was). I then headed to Brett's house. When I got to Brett's house, I saw that his friend's car was in the driveway. Not thinking much of it, I walked up to his house, and when I was about to walk in, Brett met me at the door. He insisted that I go home and change into my fancy clothes for our fancy date. He also said that as soon as I am ready I should call him to let him know. I thought it was a little weird and suspicious, but didn't think much of it. 


At our celebratory dinner, eating 3 lbs of pasta. He even had dessert after.

After going home to change, my mother calls and asks me to come over to help her order something for her at that very moment. I didn't understand why, but I went over and did it anyway. After ordering what she supposedly needed, I headed over to Brett's house. At this point, I know something is happening, but not really sure what. When I get to Brett's house, and walk inside, Brett is standing in the middle of the kitchen all dressed up with about 200 candles lit with some very romantic music playing in the background. I, of course, instantly started crying because I know what's happening. He makes this beautiful speech and gets down one knee and pops the question that I say "yes" too (surprise). 

Red in his formal wear. Isn't he the cutest?!

After we shared our news with our family and close friends, I let everything sink in. I connected all the dots. He had had my friends, his friends, and several of my family members all involved. Even my mom, who didn't actually need anything ordered. He even had a video camera set up to record it. It was so sweet, and I was so surprised. He even put our dog, Red, in a bow tie. Sorry, for all the bragging. It was truly one of my favorite days of my life. 

Thanks for letting me share my special engagement story. I'm now in wedding planning mode. I will share more about that soon. 

Talk to you soon,

Andrea 


Friday, August 26, 2016

Filing Cabinet DIY Makeover Redo

Where has the summer gone? Schools right around the corner for me. Classes start up at the end of August. Hopefully, the next few weeks go by semi-slowly. It's been quite a while since I have even glanced at my blog, let alone post anything. Time seemed to fly by. 

I have been keeping very busy. In July, I took a vacation to Maine to visit family. It was absolutely amazing. It was my first time flying. It was absolutely beautiful up there. I might just move up there. Maybe. I'll share more about my trip to Maine later. Recently, I have been on redoing furniture kick. It started a year ago with this dresser I had that was badly in need of sand down and paint job. My sister and I sanded it down to it's bare bones, and then we painted it. I kept the handles that were on it, but just spray painted them to go with my newly painted dresser. Ever since, I have sought out pieces of furniture that I think have potential. 
I recently purchased a dowdy oldish filing cabinet that was in need of some TLC. I found it on one of those local swap and shops on Facebook. If you don't belong to any of those, you should! I have found lots of great deals on there. I got a Kitchen Aid that was lightly used and only a year or two old, for $100. Not everything that you see on there is amazing, but sometimes you stumble on some amazing deals.
Back to the filing cabinet, I had seen on Pinterest some posts about filing cabinet redos. They gave me ideas, but none of them really did what I wanted to do with my filing cabinet. Basically, I spray painted my filing cabinet. Then with the drawers, I covered them with some peel-and-stick adhesive laminate (the stuff you stick on cabinet shelves ). The finish product was amazing! It turned out better than I had expected. 
The only problem is that I took before pictures. However, they some how got deleted or corrupted between the time I took them and put them on my computer. 

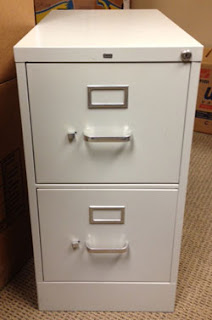
Before:

This isn't my exact filing cabinet. I don't have before picture. However, this is what it did look like. However, imagine it with a bit more grime and wear. 

DIY filing cabinet makeover redo quick and easy

After:

After some a little elbow grease and paint, it is brand new. A lot easier to look at than before. 

DIY filing cabinet makeover redo quick and easy

Here is what you'll need:

1 can spray paint primer
1-2 cans spray paint, in color of choice
1 roll of peel-and-stick adhesive laminate (I found some at Walmart for like $5)

Note: I used Rust-Oleum clean metal primer and Rust-Oleum  gloss spray paint in 

Maui Blue.


Here's what I did:

First, I cleaned the filing cabinet and the drawer. I used Goof Off to get it all the grime and stickers off. This next next step is optional. I used a sanding block to just rough up the previous paint job and so that the paint will have something to adhere to. I did just a bit of it. 
Basically, just enough to get the shine off. You can skip this step if priming.
I then took the drawers out, and took off the hardware. Next, I primed the whole cabinet including the drawers. I found that precious cabinet color bled through the laminate, so I thought it best to prime it white so you won't have to worry about the previous color to bleed through.
After letting the prime dry thoroughly, I spray painted just cabinet in the color I chose. While that first coat was drying, I very carefully I very carefully peel and stuck on the laminate on the drawers. I cut the laminate larger than the size of the drawers, and then folded extra that ran over the edges. I tapered them over the edges and cut off the extra. I kept the handles silver as that was the color I liked the best, but I spray painted the other piece on the front the same color as the rest of the cabinet. 
After the cabinet dried, I sprayed another coat on. I let that dry. Mine needed only 2 coats, but you may have to do 3 coats. I then put the hardware back and slide the drawers back in. And that's it. All done!  

This project was relatively easy and quick to complete. I am still very happy with my finished product. I have gotten several compliments on my filing cabinet. Someone asked me where I got it. So, don't be afraid to roll up your sleeves and DIY. :)

Thanks,

                                                Andrea 

Friday, January 29, 2016

One Pot Garlic Parmesan Pasta with Broccoli

I hope everyone had a merry Christmas and a happy New Year. Classes have started back up for me. I am busier than I ever was, After November began, time flew. It was a very difficult end of 2015 for my family and I, but we made it through. That was one of the main reasons I have posted anything on my blog for such a long time. It went to the back burner after the beginning of November. 

The New Year has flown by, I can't believe it is already the beginning of February. Because I am so busy, sometimes I want something that's loaded with CARBS and quick to make. This One Pot Garlic Parmesan Pasta kicks butt. It is so yummy, and easy to make. Throw everything in pan, put a lid on it and stir it every so often? Sign me up! Because it's pasta, I don't have it often, but sometimes I just need a cheat on my healthy diet, and this usually does this trick. Plus, I add brocolli-- so that means the whole dish is healthy...?

Side notes: This pasta is cooked in the same pot from start to finish. This recipe can be doubles very nicely. The addition of the broccoli is optional. I add the broccoli about 10 minutes before the pasta is done cooking.


One Pot Garlic Parmesan Pasta with Brocolli
adapted from Damn Delicious

Ingredients:

1 tablespoon olive oil
4 cloves garlic, minced
2 cups chicken broth
1 cup milk, or more, as needed
2 tablespoons unsalted butter
8 ounces uncooked fettuccine
Kosher salt and freshly ground black pepper, to taste
1/4 cup freshly grated Parmesan cheese
1 pkg. frozen broccoli (12-14 oz.) (optional) (fresh broccoli can be used)
2 tablespoons chopped fresh parsley leaves

Directions:

    1. Heat olive oil in a large skillet over medium high heat. Add garlic and cook, stirring frequently, until fragrant, about 1-2 minutes.
    2. Stir in chicken broth, milk, butter and fettuccine; season with salt and pepper, to taste.
    3. Bring to a boil; add broccoli. Bring to boil. Reduce heat and simmer, stirring occasionally, until pasta is cooked through, about 18-20 minutes. Stir in Parmesan. If the mixture is too thick, add more milk as needed until desired consistency is reached.
    4. Serve immediately, garnished with parsley, if desired.


    Thanks for reading, and I hope you enjoy your pasta!I know, I will! 

    Peace, love, bake on.

                                                 Andrea