Where has the summer gone? Schools right around the corner for me. Classes start up at the end of August. Hopefully, the next few weeks go by semi-slowly. It's been quite a while since I have even glanced at my blog, let alone post anything. Time seemed to fly by.
I have been keeping very busy. In July, I took a vacation to Maine to visit family. It was absolutely amazing. It was my first time flying. It was absolutely beautiful up there. I might just move up there. Maybe. I'll share more about my trip to Maine later. Recently, I have been on redoing furniture kick. It started a year ago with this dresser I had that was badly in need of sand down and paint job. My sister and I sanded it down to it's bare bones, and then we painted it. I kept the handles that were on it, but just spray painted them to go with my newly painted dresser. Ever since, I have sought out pieces of furniture that I think have potential.
I recently purchased a dowdy oldish filing cabinet that was in need of some TLC. I found it on one of those local swap and shops on Facebook. If you don't belong to any of those, you should! I have found lots of great deals on there. I got a Kitchen Aid that was lightly used and only a year or two old, for $100. Not everything that you see on there is amazing, but sometimes you stumble on some amazing deals.
Back to the filing cabinet, I had seen on Pinterest some posts about filing cabinet redos. They gave me ideas, but none of them really did what I wanted to do with my filing cabinet. Basically, I spray painted my filing cabinet. Then with the drawers, I covered them with some peel-and-stick adhesive laminate (the stuff you stick on cabinet shelves ). The finish product was amazing! It turned out better than I had expected.
The only problem is that I took before pictures. However, they some how got deleted or corrupted between the time I took them and put them on my computer.
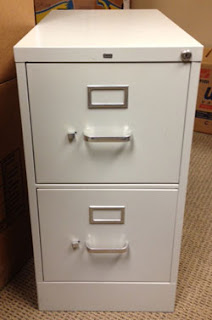
Before:
This isn't my exact filing cabinet. I don't have before picture. However, this is what it did look like. However, imagine it with a bit more grime and wear.
After:
After some a little elbow grease and paint, it is brand new. A lot easier to look at than before.
Here is what you'll need:
1 can spray paint primer
1-2 cans spray paint, in color of choice
1 roll of peel-and-stick adhesive laminate (I found some at Walmart for like $5)
Note: I used Rust-Oleum clean metal primer and Rust-Oleum gloss spray paint in
Maui Blue.
Here's what I did:
First, I cleaned the filing cabinet and the drawer. I used Goof Off to get it all the grime and stickers off. This next next step is optional. I used a sanding block to just rough up the previous paint job and so that the paint will have something to adhere to. I did just a bit of it.
Basically, just enough to get the shine off. You can skip this step if priming.
I then took the drawers out, and took off the hardware. Next, I primed the whole cabinet including the drawers. I found that precious cabinet color bled through the laminate, so I thought it best to prime it white so you won't have to worry about the previous color to bleed through.
After letting the prime dry thoroughly, I spray painted just cabinet in the color I chose. While that first coat was drying, I very carefully I very carefully peel and stuck on the laminate on the drawers. I cut the laminate larger than the size of the drawers, and then folded extra that ran over the edges. I tapered them over the edges and cut off the extra. I kept the handles silver as that was the color I liked the best, but I spray painted the other piece on the front the same color as the rest of the cabinet.
After the cabinet dried, I sprayed another coat on. I let that dry. Mine needed only 2 coats, but you may have to do 3 coats. I then put the hardware back and slide the drawers back in. And that's it. All done!
This project was relatively easy and quick to complete. I am still very happy with my finished product. I have gotten several compliments on my filing cabinet. Someone asked me where I got it. So, don't be afraid to roll up your sleeves and DIY. :)
Thanks,
Andrea


No comments:
Post a Comment