Showing posts with label Hair. Show all posts

Sunday, May 5, 2013

A curly do.

Hello everyone! It's been much to long since I have updated anything. I have been super busy with so many wonderful things. One of these wonderful things was prom, I recently had prom, and for my prom I did my hair and three of my friends' hair (which was a lot). And then I styled four more people's hair for a different prom which was 2 weeks after mine. With that alone I have kept busy. But on top of that the school year is starting to wind down (thank goodness!), and with that happening teachers are piling the homework on to us and I am having difficulties with trigonometry which does not help the situation. And about 3 weeks ago, the play which I had been working on for 2 or 3 months was finally over with which was bitter sweet (mostly sweet, though). To make things even better I have this cold or something which is just peachy. And with this cold, I have a solo in my choir concert this week, hopefully I will be better by then (fingers crossed!).

But since the prom season for me is finally over with, I wanted to make a new post. And this new post is about a curly hair style  I did on my sister's hair. She has amazing long soft hair and is just so much fun to play with but she doesn't let me do so very often. But when she does it is like opening presents on Christmas morning (slightly exaggerated). This hairstyle that you will see was for a formal 8th grader thing at her grade school. It was so pretty!


To do this curly do you will need:

  • 1/2 inch- 3/4 inch curling iron. Or if you have a curling wand that will work to. (I didn't use a curling wand because mine was broken, so instead just wrap the hair around the barrel of a normal curling iron and don't use the clip)
  • bobby pins
  • flower or some other cute hair accessory 
  • hair spray and a heat protectant (to keep from getting damaged from heat)
  • comb to tease hair
  • clips to section hair
To do this hairstyle:

  1. First start by sectioning the hair to curl. I just did a standard section by doing the bottom section first and then a middle section and so on.
  2. Next get a piece of hair 1/2 to 1 inch thick. It depends on how big and thick you want the curls to be. I did most of mine about 1/2 inch thick. 
  3. After getting a piece of hair wrap the hair around the barrel. Leave it on the barrel for 10- 30 seconds and this to depends on how hot your curling iron is. Make sure not to leave it on there for to long. 
  4. Continue doing this until you have done this to all the hair. Make sure to hair spray your hair after each section or spray after curling it all.
  5. After curling all the hair, comb back from the top your head to the crown. Then tease the hair near the crown to give the hair some volume. 
  6. The hair that you just combed back and teased at the crown pin back with bobby pins at the back of the head in the middle. Make sure that on each side you take about the same amount so it looks even. Also make sure hair in front of the ears is pinned back with it. 
  7. After sufficiently bobby pinning, put the flower or other hair accessory in the middle where the bobby pins are. I placed mine right over the bobby pins so that the pins could not be seen. 
  8. Spray hair once more with hair spray with good measure.

And voila you are done!
... It's that easy. And rather adorable. Hope my instruction weren't unbearable and weren't to confusing. Remember have fun!

                                                                          Andrea 


Saturday, April 6, 2013

Hairs ideas for PROM-- Part II


Hey everyone! So I promised another post devoted to Prom hairstyles, and I intend to follow through. I have  just been so busy. Among fighting sickness, getting lines memorized, and getting songs down and memorized, I almost forgot about it. To say the least I keep busy, usually. 

So if your prom isn't already here or isn't around the corner, it will be soon. It comes faster than you think. Time really flies by. 

So I have a friend that asked me to help her find a hairstyle for prom for her hair. She has short brown gorgeous hair. She has a strapless gown, so she wants her to be down. And so I had a mission, and on my mission I found that a lot of hair style were similar, especially when  they were hairstyles that were down loose instead of up in an up-do or something. But I learned after realizing that it all depends on the technique in which you style and prep your hair.

So I wanted to give some ideas and pictures to show you some different ideas for short curly hairstyles.

This hair style is super cute and fun. To do this hairstyle, you could either use a 1/2 curling iron or 3/4 inch curling iron. Depends on how short you hair. I can't guarantee the same results, but it should be the type of curl. Here is a good hair tutorial for this type of hairstyle. Looking on YouTube for tutorial is a good source to help you curl your hair.  This would be great if you want something care free and bouncy. 


This hairstyle is very vintage but screams classy! Personally, if I had short hair this is how I would always wear my hair. I feel like it is a timeless hair style. I found a couple great tutorials that I have to share with you because they each go at it with a different technique but they are each so pretty. Here is the first one, my favorite, I think. Another one you find HERE, is also really good. And the last two that I also love are HERE and HERE. I am sure there are even more great ones that are on YouTube, but these are the ones that stood out to me the most. 


There are two other prom hairstyles I found but couldn't find good pictures to depict them. So I am just going to direct you to tutorials. The first is curling you hair with a flat iron. It would give you a unique curl, and you can find a good YouTube tutorial here. It even shows you how to add volume. BONUS! Last but certainly now least, I found this super chic hairstyle tutorial that I just have to share, and you can find it right here. I love it.

All these hairstyles would be great for prom, you just have to dress them up, add volume and a flower or a different accessory. You could even try to incorporate braids. I love braids. And they always look cute. For example you could curl your hair and then do a water fall braid. Just in case you don't know what or how to do a waterfall braid, so here is one that'll teach the basics.  

Those are some ideas, and now just run with it. Be creative. Thanks!


                                                                   Andrea 

Saturday, March 16, 2013

Hair Ideas for PROM.

So, I am going with this series posts themed around Prom which is coming up. And while I was looking for hair ideas for some of the girl's hair I will be doing for Prom, I thought that I should help you find and give tip for your hair for Prom. 

On this trek through the internet, I found so many wonderful sites that were full of advice and different unique hairstyles. Some of them were better then others. 

The first site I found was full of so many different articles about different styles and hairstyles for different lengths of hair. It is called Latest- Hairstyles. It had details for each style about how a person could do that hairstyle. And it pretty cool. You should definitely check it out. 


The next site was from About.com. It was very detailed. And it had all the hairstyle prom trends for 2013. With every type of hairstyle there were examples and details about what you would need to do the hairstyle and what type of hair is best for it. 


The other site that I loved was at Seventeen. This article had all the hair trends for Prom in 2013. It explained with each hairstyle how to do the style. Definitely take a look.


I will have a more detailed post to come for hair trends, styles, and tips to come up. Until check out these websites because they are pretty great. 
I also wanted to tell you to also check out Pinterest because they are some really good hair boards on Pinterest. 
Until next time, have fun and good luck!

                                      Andrea 

Monday, February 25, 2013

A fishtail braided hairstyle

I am not sure what to call this braided hairstyle, but I will thoroughly explain it to you.
Basically, this braid is three fishtail braids braided into a standard braid. 
I did this braid on my sister a while back and I found pictures of it. So I decided to share it with you. The great thing about it is that it is rather simple to do.


To do this hairstyle you need some rubber bands/ hair ties. 
To begin section the hair into three even sections to braid into fishtail. Next braid each section, doing a fishtail braid. Tie each braid back with a rubber band. After you have braided all three sections, braid the three sections together doing a normal three strand braid. After you have braided them together, tie back the braid with either a hair tie or rubber band. You should now be able to remove the individual rubber band from the three original fishtail braids. 

I would recommend using rubber bands for the three fishtail braids because they are rather small and not very visible. So if you don't take the rubber band off the braids for some reason then it is not very noticeable. 

As always , good luck and have fun!

                                           Andrea 

Friday, February 22, 2013

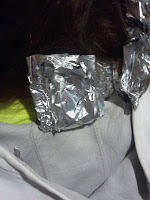
Foil Curls

Did you read the title and say "What"?  Well I can reasure you that these curls are so adorable. I have done many types of curling and this one was really insteresting. I was experimenting and after some research I found this type of curling, and I had to try it out for myself.
If you have problems getting your hair to curl with a curling iron, try this technique. You might find that it works for you. My sister, who I first tried this haristyle on, has extremely long, thick straight hair. And so as you maybe able to infer, her hair doesn't always hold curl well. But these curls held fairly well. With hairspray these curls held really well in her hair.
To do this hairstyle you will need:
Foil (cut into squares or rectangles)
hair straightener

Seems simple, right?
  1. The size of your foils pieces depends on how long your hair is and how loose you want your curls. I average size of my foil pieces was about 6 x 8 and that was for my sisters long hair. The smallest you would want to go is 4 x 6.
  2. Before coiling your hair, brush through your hair to get rid of tangles. After, coil a strand of hair about 1-2 inches thick around your fingers. I used 3 fingers for a looser curl, and use 1 finger for trighter curls.
  3.   Fold a piece of foil around the coiled strand. To do this place the coiled hair on foil, then fold foil in half, and the fold up. Then fold the sides in if there is extra foil room. 


4. Repeat this step until you have gone all the way around your head putting all the hair in foil.


 5. Using your hair straightener, heat the foil. For larger curls, 40-50 seconds, and for smaller curls, 20-30 seconds. I did mine for about 30-40 seconds. 
6. After doing this to each piece of foil, let your hair cool completely. After it is cool, unwrap each foil. The foil slides of but it can make your hair frizzy, so I would unwrap each gently to keep from getting frizzy. 

You can hair spray, if you would like but you don't have to. Style with the curls as you want or leave them the way they are because they are just so great.


 And there you have it, foil curls. Try it and you won't be disappointed, I wasn't. Good luck and don't forget to have fun! If any of of my instructions are unclear, please comment.

 **One side note my sister who I did this hairstyle on has very thick and straight hair. So her hair doesn't always curl well. So the curls may very in size and bounce depending on hair type and how thick you make each coil.
                                                   Andrea 

Sunday, February 10, 2013

Hair Bows

Do you want something fun and quirky? Well, a hair bow may be right up your alley. Hair bows are super cute and very original. It's not very often you see everyone trending a hair bow. 


The great thing about hair bows is that they can be taken to from day to night. They can be dresses up and down. So they are really versatile. 
Another plus is that they are super super easy. They take 5-10 minutes, so can easily be done in the morning rush.

All you need is a hair ties and a few bobby pins.

Directions:
  1. First put your hair up in a high ponytail but before you put through the last loop make a bun.
  2. Next carefully section the bun in half evenly.
  3. Separate the halves by pulling apart. 
  4. Put each side to the side of your ponytail with a few bobby pins until it is secure. ( for a better example of what it looks like look above at my pictures)
  5. Now you should have this little tail in the front from the bun, next you flip that to the back so it looks like the center of a bow. Use a bobby pin to secure that. 
  6. All Done!

There you have it a hair bow. If my instructions are too confusing, I am so sorry. I am really working hard on my communication skills. If there are problems, you can comment and you can always search for a good video. This video is pretty good tutorial. 

Thanks!

         Andrea


Thursday, February 7, 2013

Fishtail Side-do

Do you need a super cute hairstyle that looks intricate with out a huge hassle? Well over Christmas, I did this cute and rather simple braided do on my sister. As long as you know how to french fishtail braid diagonally then you can do this hairstyle. 


My instructions are most likely are really confusing, but this hair style is really simple. SO you could probably just look at the pictures to understand what you need to do.

But if you are brave and want to try out my instruction they are below, good luck!


To do this hairstyle follow these few simple steps:

All you need is a rubber band or two, bobby pins, and if you want to a cute pin or flower.
  1. Starting at either the left or right top side of your hair pick up two 1/2-1 inch pieces of your hair. Then french fishtail braid diagonally down to the other side of your head braiding all the way the to the ends.
  2. Next you need tie that braid back with a rubber band so that it doesn't come undone. ( I usually a black or clear band, so that it isn't as visible)
  3. After you should gently wrap the braid into a bun or, for lack of a better description, wrap the braid where the braid diagonally is and coil or wrap it into a bun type thing like it is pictured above. (wrap the end of the braid under the bun so that the band isn't visible)
  4. Secure it with bobby pins. 
  5. Put a hair accessory where you like to make it even prettier.   


If my instruction were to confusing, please tell me so. PLEASE. Leave a comment below to tell me what was confusing and/or how I can make them better.

Thanks!
            Andrea


Saturday, January 26, 2013

Don't you love your hair?

You love your hair, right? I love my hair too. And I was going through all the list of things that I do with my hair and there is definitely a long list. Taking a good care of your is key to having healthy hair. 

If you love something you want to do all you can to take care of it. Well, here are a few things you shouldn't do and tips that you should do to help you on that tedious mission of taking care of your hair.

p.s. The bolded type are the things that are problems and below are tips to help you. 
1. To Much Heat

    The blow dryer, flat iron, and curling iron can all cause heat damage to your hair. Not that you should use these but with a little caution. Before using your blow dryer, flat iron, or curling iron, use a product that protects your hair from the heat. Treseme has affordable spray called Thermal Creations Heat Tamer Spray. Redken also has a good hair protection spray called Iron Silk 07 Ultra Straightening Spray.You can buy that any drugstore or Walmart. The reason I mentioned this one as number one is because this one is the most forgotten or missed.


2. Washing To Often

Washing your hair to often can have an adverse effect. So unless you have super oily hair, there is no reason to wash your hair everyday. Washing to often can make your hair brittle and dry, which we obviously don't want. I would recommend to wash your hair every other day or two. If you have long hair you could probably go two days with out washing your hair. If you need some boost in your hair try dry shampoo. 


3. Brushing To Much

Have you ever been told to brush 100 strokes through her hair before bed. Well my grandmother once told me and at the time made since but now we know that is just not correct. That's a lot of brushing, to much in fact. Brushing your hair is good but like anything you do only in healthy amounts.  Brushing your hair to often can cause split ends or breakage in your hair. It can also cause your to be static-y. So only brush your hair when necessary. 


4. Brushing When Wet

Never, ever brush your hair when it's wet. Instead use a wide-toothed comb. Start at the bottom and work your way up. Don't tug on your tangles in your hair (more on this).


5. Being To Tough With Tangles

Remember how I mentioned how to handle wet hair? It's important not to tug at tangles. Doing so could cause breakage.  Use a de-tangling spray and gently work through the tangles in your hair. If you have curly hair like I do then brushing your only really ruins your curls. So what I do is, I only brush my hair when I am going to style it like curling my hair or straightening it.


6. Skipping the Conditioning Step

When washing your hair, it's so very important. Skipping conditioner can leave your hair dry, dull, and prone to tangles. With my curly hair, I never skip conditioner because if I do, my hair is a huge tangle-y mess. And so this brings me to my next point, conditioner helps keep you from having those impossible tangles that are hard to get out. 


7. Skipping Trims

We are all guilty of this-- me very much so. Even if you are trying to grow out your hair, getting trims will help keep your looking and feeling healthy. Getting trims will also keep your hair in shape and add style, so you might not get frustrated with it and get it cut again.


8. Living A Bit On The Wild Side

Bad habits such smoking, drinking, and skimping on sleep can really reek havoc on your body, including your hair. Though I am not saying to become a good-to-shoes for the sake of your hair, I am saying that with anything there is limit on anything good or bad. If you do over indulge, treat your hair to some extra prep time the following day. 


I am guilty of many of these things and I am trying to fix many of these. Which of these steps are you guilty of?Though it maybe hard to admit fess up!  Are there other hair sins you commit? Do tell.


                                                           Thanks and Good Luck!
                                                                                   Andrea